Wednesday, September 19, 2018

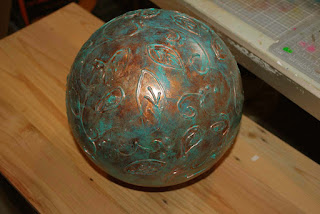
bowling ball turned into garden art

I've read posts about turning bowling balls into a gazing ball or some type of garden art and always wanted to try this.  Then a friend gave me a old bowling ball.  She was an avid bowler but hadn't bowled in a long time.  She was happy to give it to me rather than have it collect dust in a closet.  Now I'll admit this project sat in my pile of "to do someday" projects for a year or so.  I'm glad I finally got around to doing this and it's out of my studio and into my garden.


I just love copper and verdigris color so that was my starting point when planning out a design. I wanted a look of embossed leaves in a copper patina. 

Now I forgot to take a photo of the original bowling ball but it started out as a plain black bowling ball.  I decided to plug the holes with some pieces of wine cork then topped them off with leftover grout from a house project.   Since this would be outside in the garden I didn't want to clean out dirt, mulch, or spider nests from the holes when I brought it in for the winter.  I let the grout set for 24 hrs.

After the grout was set I painted it using Rust-oleum Paint & Primer Spray Flat White.  I let this dry overnight. Oh I should also mention I used a ring from a mason jar as a stand to hold the ball when painting.


Besides copper and verdigris color I love leaf designs. To get a raised leaf design I used a tube of dimensional fabric paint with a thin point and painted leaves and swirls over the ball.  The color of the fabric paint really didn't matter since it would be covered up with spray paint.


Next step was to paint it copper.  I had an old can of Rust-oleum copper spray paint and gave the piece 2 good coats, allowing for drying time in between.


Then I wanted to give the copper an aged look.  I used alcohol ink (surprise, surprise) Teakwood by Ranger. Using a rag I dabbed the alcohol ink over the ball keeping some spaces clear to show the shiny copper. 

 
Next came the process to give it a patina look.  I had a bottle of Patina ink "Verdigris" for metal by Ranger that I bought for some metal charms. This bottle looks like an alcohol ink bottle but formulated for metal.     I thought it would be perfect to give it that verdigris patina finish.


Last step was an important one - sealing.  Since this would be outside I wanted to make sure it was sealed and protected from the weather (although I will bring it indoors for the winter).  First coat was Kamar Varnish by Krylon.  I let that dry overnight.  Then 2 coats of Rust-oleum 2X Ultra Cover Matte Clear Spray Sealer.

And the piece has been sitting in the garden since June and has held up well. I enjoyed turning this old bowling ball into a piece of art that can be enjoyed in the garden.



Friday, July 13, 2018

Fairy Garden creations

I enjoy fairy gardens and since they've been so popular lately it means there are lots of pieces available to purchase to make your fairy garden unique.  I bought a few pieces but then wanted to try my hand at making some.  These pieces were from a winter project that I finally got around to sealing and putting out in the garden. 

Now as many of you know, fairies really don't need sign posts.  I think the signs are more for us so we know the possible places they are in when not in our gardens.  Here's the sign post I created for my fairy garden.  The sign pieces are made from popsicle sticks and the main post is a square wooden dowel I bought at Michaels. The locations are simply the places that our garden fairies love to visit.


And what would a garden be with some bird houses?  These were made from pieces of wood from a kitchen construction project. Wooden chopsticks were used for the posts.  The roofs are made from pieces of thin craft copper-like metal that I had lying around the studio.  After everything was painted I gave the bird houses and the sign post a few coats of outdoor matt sealer.


The fairy garden pieces are  in a raised bed planter that mainly holds herbs plus other small fairy garden plants.  A few more fairy décor pieces are being planned.  Hope to get them done this year!
 

Monday, March 5, 2018

a new year and more alcohol inked tiles!

As I brushed off the dust of this art blog I find it's almost a year to the day from my last post. And lo and behold it's the same thing...alcohol inked tiles!  Too funny. 

This is a tile I created last year but I added some Zentangle-ish designs with a Micron pen. I really liked how it turned out. It is a 4 x 4 inch ceramic tile purchased at a hardware store.


This one is a glass tile - approx. 5-3/4 x 3 inches.  You can also find this tile at hardware stores in the tile department. It started out as a clear glass tile and I kept adding different blue inks till I was satisfied with the results.  I used a white zig pen to add white highlights the tile had dried.  Still not sure how to display this.  Would be great to have some type of band around the tile to hang in a window.  Need to give that some thought.
 

I like the fun, bright colors of this tile.  Unsure if I want to add a word or quote, or an embellishment. I'll let this sit around an percolate for awhile (but hopefully not for a year!)